Starting anew in 2015 – a resolution – the foremind

As the new year broke upon us just over two weeks ago, I found myself wondering what resolutions I should make to improve myself during the next twelve months.  In the past I have made resolutions about inconsequential things like reading more books or taking more photos.  I even tried to participate in a photo a day and managed to make it through two months before giving up.

This year I have decided that the foremost goal should be to live a better life, but what does that really mean?  To many, living a better life can mean that you drop a bad habit (for example, smoking).  To others, living a better life can mean that you start doing something new that would improve your overall quality of life.

I have decided to start simply with the goal of improving my physical and mental well-being.  In late 2014 I started on this path by giving up my habit of smoking.  I was hard and sometimes I still find myself in a situation where I could easily slip backwards into that habit, so I must remain vigilant.  As a follow-up to this physical life improvement, to start out with 2015 I have decided to add a two-day per week exercise regimen.  Not only will my exercise help combat the intake of excess calories from my beloved sweets (cake, cookies, M&M’s and the like), but it will also bolster the improvements to my blood pressure and stress levels that I started with cutting out the cigarettes.

As for the mental improvements, the first step on this path will be a closer and deeper understanding of my relationship with Christ.  The beginning of this journey should start with a deep dive into The Word.  A friend of mine once said that it is impossible to really know how to be a Christ-follower without knowing the words that He said and the context in which they were posited.

Creating a firewalld service for Plex Media Server – the foremind

plex_firewalld-6918354I recently rebuilt my Plex Media Server box as a CentOS 7 VM running on Hyper-V on a Windows Server 2012 setup.
When I installed the rpm and started the service I found that I was unable to load the interface on my desktop. I knew that it was running because I installed netstat and I was able to see the port was open for traffic and I was also able to load the interface locally in lynx on the server.

UPDATE: At some point I rebuilt my server and I came back to this post to grab my config.  It turns out that I had a typo in one place and a missing command in another.  I have edited this post to correct the issues.  I have followed the new steps on several machines and this process does work without adding additional files in: [code]/usr/lib/firewalld/services/[/code]

It turns out that there were two issues:

Disabling SELinux was as simple as editing the configuration file (/etc/selinux/config) and setting the value of selinux to disabled.

Dealing with firewalld was also initially simple as well:

[code language=”bash”]# systemctl stop firewalld[/code]

The problem with this approach is that I was completely disabling my server’s software firewall. The proper approach would be to create a ruleset that allows for the various ports of Plex Media Server to be open in my server’s active firewalld zone.

Fortunately this is relatively easy to accomplish:

  1. Create the new service configuration file in the services directory
    [code language=”bash”]# vi /etc/firewalld/services/plexmediaserver.xml[/code]
  2. Next add the ruleset using the XML format established for firewalld rules[code language=”xml”] plexmediaserver Plex TV Media Server

    [/code]

  3. Save the service file
  4. Reload the firewalld configs [code language=”bash”]# firewall-cmd –reload

    success[/code]

  5. Add the service to your active zone (by default it is the public zone, but I have changed my default zone to be the home zone)
  6. [code language=”bash”]# firewall-cmd –permanent –zone=public –add-service=plexmediaserver
    success[/code]
  7. Restart the firewalld service[code language=”bash”]# systemctl restart firewalld.service[/code]
  8. You can get the defined service list from firewalld as follows: [code language=”bash”]# firewall-cmd –get-services

    RH-Satellite-6 amanda-client bacula bacula-client dhcp dhcpv6 dhcpv6-client dns freeipa-ldap freeipa-ldaps freeipa-replication ftp high-availability http https imaps ipp ipp-client ipsec iscsi-target kerberos kpasswd ldap ldaps libvirt libvirt-tls mdns mountd ms-wbt mysql nfs ntp openvpn plexmediaserver pmcd pmproxy pmwebapi pmwebapis pop3s postgresql proxy-dhcp radius rpc-bind rsyncd samba samba-client smtp ssh telnet tftp tftp-client transmission-client vdsm vnc-server wbem-https[/code]

Now that this is done you should be able to hit the Plex Media Server web interface from a web browser on any other machine in your network.

Software bundling should be opt-in – the foremind

According to the FileZilla FAQ:

FileZilla is free open-source software distributed under the terms of the GNU General Public License free of charge.
Basically this means that everyone, including corporate entities, can use FileZilla, including but not limited to private, educational and commercial use.

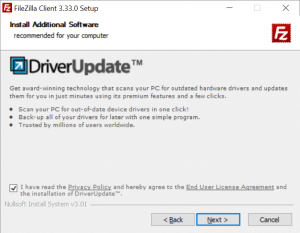
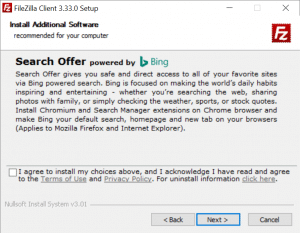
When you install it you have to opt out of at least one, if not two, bundling offers.  While many installers provide you the opportunity to install a bundled offer, I really think that if you are releasing the software as open-source under the GPL, then you should embrace the spirit of the license and make the included bundles opt-in.  And why you are at it, maybe you could add a section to the FAQ on what the funds for the bundles and the website sponsors are used for.

filezilla_optout2-300x233-2871193 filezilla_optout-300x233-9059436

Resolutions – 2015 – the foremind

Each year I make a host of resolutions that I fail to keep.  In my post, Starting anew in 2015 – a resolution, I stated some general guidelines that I am going to follow for 2015, so I thought I should lay them out in a bit more detail, as I feel this will help keep me on course:

  1. Read the Bible completely
    I feel that one of the best ways to improve myself as a follower of Christ will be to dive into The Word.  As a guide for this I am using George H. Guthrie’s book Read the Bible for Life.  My chosen translation of the Bible is the New King James version in the form of the Jeremiah Study Bible with commentary and annotations by Dr. David Jeremiah.
  2. Improve my professional career by obtaining two professional certifications
    Many professionals improve their career by attaining a higher degree.  While getting a Master’s degree in CIS or Information Management would be great, I have decided that a better way to improving my professional outlook will be by obtaining some useful and meaningful certifications.
  3. Exercise and Health Improvement
    In my quest for better physical health, this year I will be extending the benefits that I obtained by quitting smoking by exercising regularly as well as improving both my health tracking and my diet.  Too start with I am setting out to exercise at least two days per week after work and to cutting out soda.

Configure OpenDNS for EdgeRouter X – the foremind

Recently I acquired an EdgeRouter X from Ubiquiti Networks to handle the routing and firewall functions of my home network.  This was prompted by a desire to separate each of my network functions to individual components and to get a better piece of equipment than the run-of-the-mill Comcast rental gear.

After configuring the equiment and updating to the latest firmware, I decided to also configure my network DNS to flow through OpenDNS instead of Comcast DNS.  This also allowed me to configure content filtering so that my grandchildren wouldn’t accidentally get shuffled into some crazy website instead of Disney Junior.

The steps to configure this are not quit as simple as on some other setups.  OpenDNS didn’t have any instructions on this and sent inquiring users to the Ubiquiti Community Forums.  Here is the method that I used:

Step One – Open main system configuration

In the main windows of the web interface for the EdgeRouter X, click on the System button towards the bottom left of the window. This will bring up the main system configuration screen.

Step Two – Configure the System Name Server values

Add the first OpenDNS IP address in the visible field.  Click the Add New button to add a second field, then enter the second OpenDNS IP address into that field.  Scroll down to the bottom of the System settings and click the Save button.

Step Three – Login to the command line interface

In the upper right section of the admin interface, click on the CLI button to open a window to the command line interface (aka cli).  When the window opens, login using the same username and password you use for the web interface (Security Tip: please take the time to change the password from the default…)

Step Four – Update the DNS Fowarding

After logging into the cli, you need to enter the following commands:

configure
set service dns forwarding system
commit
save
exit
exit

What this does is to alter the functionality of the built-in DNS forwarding service to use the system name server values instead of the values from your ISP source (in my case an Arris SB6190 cable modem connected to Comcast).

After you have completed the above steps, then you can easily control the content filtering on your network using the OpenDNS tools.