May 11, 2018May 11, 2018 by Andrew Fore
![]() If you have just installed the most recent release of the virtualization platform Proxmox, you might have noticed the that steps to disable the subscription pop-up dialog have changed, well, other than actually purchasing a subscription, I suppose. I have chosen to not purchase a subscription for the same reason I don’t have one for VMware’s vSphere Hypervisor, I am not running this in a production setting that requires paid support or premium features. The following steps will disable the subscription pop-up.
If you have just installed the most recent release of the virtualization platform Proxmox, you might have noticed the that steps to disable the subscription pop-up dialog have changed, well, other than actually purchasing a subscription, I suppose. I have chosen to not purchase a subscription for the same reason I don’t have one for VMware’s vSphere Hypervisor, I am not running this in a production setting that requires paid support or premium features. The following steps will disable the subscription pop-up.
Backup the javascript file
The pop-up contents, and whether or not are displayed, are controlled by a function in a javascript file. The first step should always be to make a backup, just in case Murphy rings your doorbell.
root@pve:~# cd /usr/share/pve-manager/js/
root@pve:/usr/share/pve-manager/js# cp -p pvemanagerlib.js pvemanagerlib.js_backup
Edit the javascript file
Open the pvemanagerlib.js file in your favorite editor. If this is a vanilla, unmodified installation, skip to line 850. If this is not the first time that you have edited the file, search for the first occurrence of the following snippet, which will be in the function that we need to alter:
gettext('No valid subscription')
The text of the check for the function should be altered so that the conditional for the check reads as follows:
before
if (data.status !== 'Active') {
after
if (false) {
Notes
As I stated in the original paragraph, the specifics apply to v. 5.1-3 and that the location of the file has changed from previous versions. A good way to find the file is to use the locate command, which you will have to install first:
root@pve:~# apt-get update
Ign:1 http://ftp.us.debian.org/debian stretch InRelease
Get:2 http://security.debian.org stretch/updates InRelease [94.3 kB]
Get:3 http://ftp.us.debian.org/debian stretch Release [118 kB]
Get:4 http://ftp.us.debian.org/debian stretch Release.gpg [2,434 B]
Get:5 http://security.debian.org stretch/updates/main amd64 Packages [374 kB]
Get:6 http://ftp.us.debian.org/debian stretch/main amd64 Packages [7,122 kB]
Get:7 http://security.debian.org stretch/updates/main Translation-en [165 kB]
Get:8 http://security.debian.org stretch/updates/contrib amd64 Packages [1,776 B]
Get:9 http://security.debian.org stretch/updates/contrib Translation-en [1,759 B]


root@pve:~# apt-get install mlocate
Reading package lists... Done
Building dependency tree
Reading state information... Done
The following NEW packages will be installed:
  mlocate
0 upgraded, 1 newly installed, 0 to remove and 85 not upgraded.
Need to get 96.5 kB of archives.
After this operation, 495 kB of additional disk space will be used.
Get:1 http://ftp.us.debian.org/debian stretch/main amd64 mlocate amd64 0.26-2 [96.5 kB]
Fetched 96.5 kB in 0s (315 kB/s)
Selecting previously unselected package mlocate.
(Reading database ... 40185 files and directories currently installed.)
Preparing to unpack .../mlocate_0.26-2_amd64.deb ...
Unpacking mlocate (0.26-2) ...
Setting up mlocate (0.26-2) ...
update-alternatives: using /usr/bin/mlocate to provide /usr/bin/locate (locate) in auto mode
Adding group `mlocate' (GID 115) ...
Done.
Processing triggers for man-db (2.7.6.1-2) ...
root@pve:~# updatedb
root@pve:~# locate pvemanagerlib.js
/usr/share/pve-manager/js/pvemanagerlib.js
/usr/share/pve-manager/js/pvemanagerlib.js_backup
As you can see the mlocate package makes finding the file so much easier.
Categories Linux, Proxmox, VirtualizationLeave a comment October 5, 2015 by Andrew Fore
One of the tools that I use on a regular basis to test network connectivity updates is the “z” option of netcat. Apparently when RedHat rolled out the latest version of their distribution of RedHat Enterprise Linux (RHEL) they decided to move to using the nmap-ncat package instead of the nc package. The command options a very different.
So when attempting to test single port like I would have under previous releases I now use the following syntax:
# echo | nc -w1 $host $port >/dev/null 2>&1 ;echo $?
If the result that is returned is a zero then you have successfully connected to the remote host on the desired port. This also applies to CentOS 7 since it is a “clone” or copyleft port of the RHEL7 binaries.
Categories CentOS, Linux, Tips n Tricks, Uncategorized1 Comment June 10, 2015 by Andrew Fore
While logging into one of the Linux jump boxes at work today, it occurred to me that while I recently got notified about my password expiration from our Active Directory farm, I had no idea when my Linux password would expire or what the password life was.
To find out this information you can easily use the chage command.
Here is what the output looks like:
[code language=”bash”][user@myserver ~]$ chage -l user Last password change : Apr 09, 2015 Password expires : Jul 08, 2015 Password inactive : never Account expires : never Minimum number of days between password change : 1 Maximum number of days between password change : 90 Number of days of warning before password expires : 7
[/code]
It may seem like such a simple thing to do, but knowing when your password expires can be a lifesaver on occasion.
Categories Linux, Tips n Tricks, Uncategorized1 Comment January 8, 2017March 17, 2015 by Andrew Fore 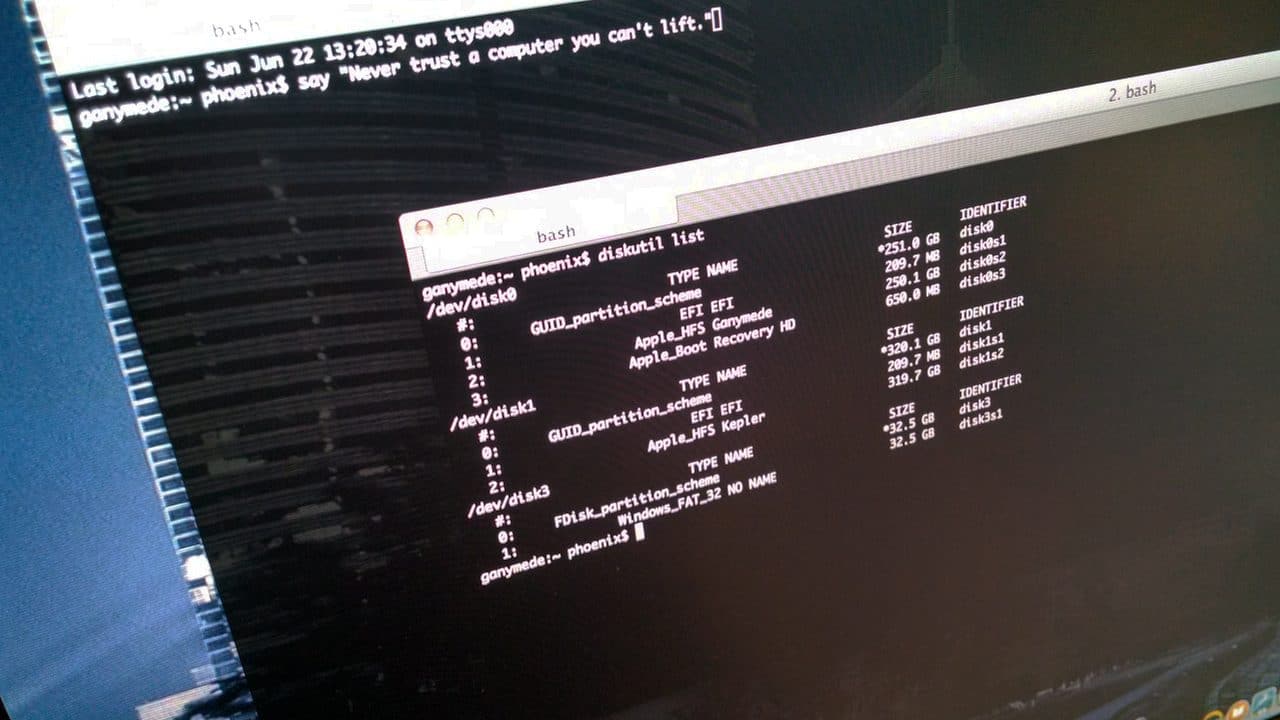
In my day job as a Systems Engineer I frequently find myself switching between different UNIX and Linux distributions. While many of the commands exist on both sides of the aisle, I often find vast differences in the command line parameters that can be consumed by a given command when used in, for example, Linux vs Solaris.
Recently I came upon this again with the need to easily ferret out the majority consumer of drive space on a Solaris 10 system. While we did have the xpg4 specification support available, the du command was still missing my favorite option “max-depth”.
In Linux I use this to limit the output to only the current directory level so that I don’t have to face to possibility of wading through a tremendously large listing of sub-directories to find the largest directory in the level I am in. Unfortunately, in Solaris, even with xpg4, the du command doesn’t have this option, so my solution was to pipe the results through egrep and use that to filter out the sub-directories.
Read moreSolaris Tip of the Week: a better du experience
Categories Linux, Solaris, Tips n Tricks, Uncategorized1 Comment


 example of the filter after applying the new sort order Categories General, Tips n TricksTags jiraLeave a comment May 12, 2018May 12, 2018 by Andrew Fore
 As the whole GDPR craze has hit my place of employment, I decided to look into an easy method for to add a privacy policy and cookie policy to my WordPress site.
 Screenshot of slide-down panel with default settings.
 example of the filter after applying the new sort order Categories General, Tips n TricksTags jiraLeave a comment May 15, 2018May 15, 2018 by Andrew Fore
